How to Build a Machine Learning API with Python and Flask

Did you ever want to make your machine learning model available to other people, but didn’t know how? Or maybe you just heard about the term API, and want to know what’s behind it? Then this post is for you!
Here at statworx, we use and write APIs daily. For this article, I wrote down how you can build your own API for a machine learning model that you create and the meaning of some of the most important concepts like REST. After reading this short article, you will know how to make requests to your API within a Python program. So have fun reading and learning!
What is an API?
API is short for Application Programming Interface. It allows users to interact with the underlying functionality of some written code by accessing the interface. There is a multitude of APIs, and chances are good that you already heard about the type of API, we are going to talk about in this blog post: The web API.
This specific type of API allows users to interact with functionality over the internet. In this example, we are building an API that will provide predictions through our trained machine learning model. In a real-world setting, this kind of API could be embedded in some type of application, where a user enters new data and receives a prediction in return. APIs are very flexible and easy to maintain, making them a handy tool in the daily work of a Data Scientist or Data Engineer.
An example of a publicly available machine learning API is Time Door. It provides Time Series tools that you can integrate into your applications. APIs can also be used to make data available, not only machine learning models.
And what is REST?
Representational State Transfer (or REST) is an approach that entails a specific style of communication through web services. When using some of the REST best practices to implement an API, we call that API a “REST API”. There are other approaches to web communication, too (such as the Simple Object Access Protocol: SOAP), but REST generally runs on less bandwidth, making it preferable to serve your machine learning models.
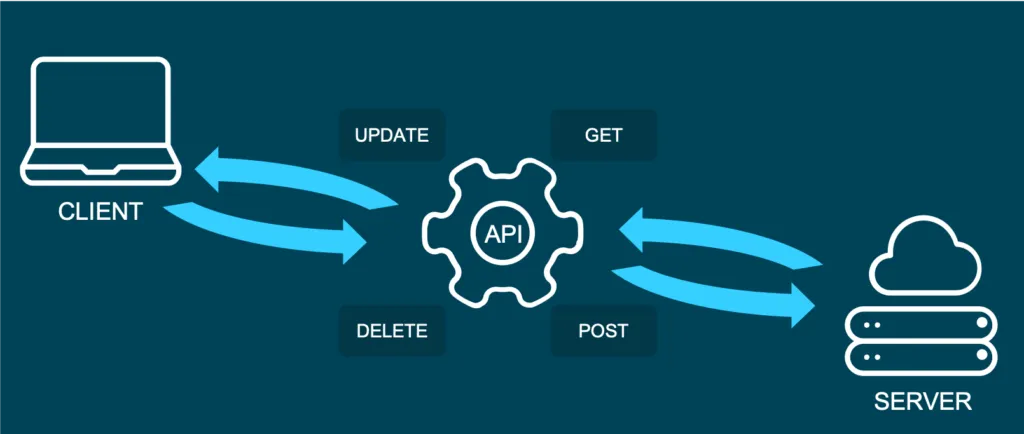
In a REST API, the four most important types of requests are:
- GET
- PUT
- POST
- DELETE
For our little machine learning application, we will mostly focus on the POST method, since it is very versatile, and lots of clients can’t send GET methods.
It’s important to mention that APIs are stateless. This means that they don’t save the inputs you give during an API call, so they don’t preserve the state. That’s significant because it allows multiple users and applications to use the API at the same time, without one user request interfering with another.
The Model
For this How-To-article, I decided to serve a machine learning model trained on the famous iris dataset. If you don’t know the dataset, you can check it out here. When making predictions, we will have four input parameters: sepal length, sepal width, petal length, and finally, petal width. Those will help to decide which type of iris flower the input is.
For this example I used the scikit-learn implementation of a simple KNN (K-nearest neighbor) algorithm to predict the type of iris:
# model.py
from sklearn import datasets
from sklearn.model_selection import train_test_split
from sklearn.neighbors import KNeighborsClassifier
from sklearn.metrics import accuracy_score
from sklearn.externals import joblib
import numpy as np


def train(X,y):

    # train test split
    X_train, X_test, y_train, y_test = train_test_split(X, y, test_size=0.3)

    knn = KNeighborsClassifier(n_neighbors=1)

    # fit the model
    knn.fit(X_train, y_train)
    preds = knn.predict(X_test)
    acc = accuracy_score(y_test, preds)
    print(f'Successfully trained model with an accuracy of {acc:.2f}')

    return knn

if __name__ == '__main__':

    iris_data = datasets.load_iris()
    X = iris_data['data']
    y = iris_data['target']

    labels = {0 : 'iris-setosa',
              1 : 'iris-versicolor',
              2 : 'iris-virginica'}

    # rename integer labels to actual flower names
    y = np.vectorize(labels.__getitem__)(y)

    mdl = train(X,y)

    # serialize model
    joblib.dump(mdl, 'iris.mdl')
As you can see, I trained the model with 70% of the data and then validated with 30% out of sample test data. After the model training has taken place, I serialize the model with the joblib library. Joblib is basically an alternative to pickle, which preserves the persistence of scikit estimators, which include a large number of numpy arrays (such as the KNN model, which contains all the training data). After the file is saved as a joblib file (the file ending thereby is not important by the way, so don’t be confused that some people call it .model or .joblib), it can be loaded again later in our application.
The API with Python and Flask
To build an API from our trained model, we will be using the popular web development package Flask and Flask-RESTful. Further, we import joblib to load our model and numpy to handle the input and output data.
In a new script, namely app.py, we can now set up an instance of a Flask app and an API and load the trained model (this requires saving the model in the same directory as the script):
from flask import Flask
from flask_restful import Api, Resource, reqparse
from sklearn.externals import joblib
import numpy as np

APP = Flask(__name__)
API = Api(APP)

IRIS_MODEL = joblib.load('iris.mdl')
The second step now is to create a class, which is responsible for our prediction. This class will be a child class of the Flask-RESTful class Resource. This lets our class inherit the respective class methods and allows Flask to do the work behind your API without needing to implement everything.
In this class, we can also define the methods (REST requests) that we talked about before. So now we implement a Predict class with a .post() method we talked about earlier.
The post method allows the user to send a body along with the default API parameters. Usually, we want the body to be in JSON format. Since this body is not delivered directly in the URL, but as a text, we have to parse this text and fetch the arguments. The flask _restful package offers the RequestParser class for that. We simply add all the arguments we expect to find in the JSON input with the .add_argument() method and parse them into a dictionary. We then convert it into an array and return the prediction of our model as JSON.
class Predict(Resource):

    @staticmethod
    def post():
        parser = reqparse.RequestParser()
        parser.add_argument('petal_length')
        parser.add_argument('petal_width')
        parser.add_argument('sepal_length')
        parser.add_argument('sepal_width')

        args = parser.parse_args()  # creates dict

        X_new = np.fromiter(args.values(), dtype=float)  # convert input to array

        out = {'Prediction': IRIS_MODEL.predict([X_new])[0]}

        return out, 200
You might be wondering what the 200 is that we are returning at the end: For APIs, some HTTP status codes are displayed when sending requests. You all might be familiar with the famous 404 - page not found code. 200 just means that the request has been received successfully. You basically let the user know that everything went according to plan.
In the end, you just have to add the Predict class as a resource to the API, and write the main function:
API.add_resource(Predict, '/predict')

if __name__ == '__main__':
    APP.run(debug=True, port='1080')
The '/predict' you see in the .add_resource() call, is the so-called API endpoint. Through this endpoint, users of your API will be able to access and send (in this case) POST requests. If you don’t define a port, port 5000 will be the default.
You can see the whole code for the app again here:
# app.py
from flask import Flask
from flask_restful import Api, Resource, reqparse
from sklearn.externals import joblib
import numpy as np

APP = Flask(__name__)
API = Api(APP)

IRIS_MODEL = joblib.load('iris.mdl')


class Predict(Resource):

    @staticmethod
    def post():
        parser = reqparse.RequestParser()
        parser.add_argument('petal_length')
        parser.add_argument('petal_width')
        parser.add_argument('sepal_length')
        parser.add_argument('sepal_width')

        args = parser.parse_args()  # creates dict

        X_new = np.fromiter(args.values(), dtype=float)  # convert input to array

        out = {'Prediction': IRIS_MODEL.predict([X_new])[0]}

        return out, 200


API.add_resource(Predict, '/predict')

if __name__ == '__main__':
    APP.run(debug=True, port='1080')
Run the API
Now it’s time to run and test our API!
To run the app, simply open a terminal in the same directory as your app.py script and run this command.
python run app.pyYou should now get a notification, that the API runs on your localhost in the port you defined. There are several ways of accessing the API once it is deployed. For debugging and testing purposes, I usually use tools like Postman. We can also access the API from within a Python application, just like another user might want to do to use your model in their code.
We use the requests module, by first defining the URL to access and the body to send along with our HTTP request:
import requests

url = 'http://127.0.0.1:1080/predict'  # localhost and the defined port + endpoint
body = {
    "petal_length": 2,
    "sepal_length": 2,
    "petal_width": 0.5,
    "sepal_width": 3
}
response = requests.post(url, data=body)
response.json()
The output should look something like this:
Out[1]: {'Prediction': 'iris-versicolor'}That’s how easy it is to include an API call in your Python code! Please note that this API is just running on your localhost. You would have to deploy the API to a live server (e.g., on AWS) for others to access it.
Conclusion
In this blog article, you got a brief overview of how to build a REST API to serve your machine learning model with a web interface. Further, you now understand how to integrate simple API requests into your Python code. For the next step, maybe try securing your APIs? If you are interested in learning how to build an API with R, you should check out this post. I hope that this gave you a solid introduction to the concept and that you will be building your own APIs immediately. Happy coding!


