Dynamic UI Elements in Shiny – Part 1


At STATWORX, we regularly deploy our project results with the help of Shiny. It’s not only an easy way of letting potential users interact with your R-code, but it’s also fun to design a good-looking app.
One of Shiny’s biggest strengths is its inherent reactivity after all being reactive to user input is a web-applications prime purpose. Unfortunately, many apps seem to only make use of Shiny’s responsiveness on the server-side while keeping the UI completely static. This doesn’t have to be necessarily bad. Some apps wouldn’t profit from having dynamic UI elements. Adding them regardless could result in the app feeling gimmicky. But in many cases adding reactivity to the UI can not only result in less clutter on the screen but also cleaner code. And we all like that, don’t we?
A toolbox for reactivity: renderUI
Shiny natively provides convenient tools to turn the UI of any app reactive to input. In today’s blog entry, we are namely going to look at the renderUI function in conjunction with lapply and do.call.
renderUI is helpful because it frees us from the chains of having to define what kind of object we’d like to render in our render function. renderUI can render any UI element. We could, for example, let the type of the content of our uiOutput be reactive to input instead of being set in stone.
Introducing reactivity with lapply
Imagine a situation where you’re tasked with building a dashboard showing the user three different KPIs for three different countries. The most obvious approach would be to specify the position of each KPI-box on the UI side of the app and creating each element on the server-side with the help of shinydashboard::renderValueBox as seen in the example below.
The common way
library(shiny)
library(shinydashboard)

ui <- dashboardPage(

  dashboardHeader(),
  dashboardSidebar(),

  dashboardBody(column(width = 4,
                       fluidRow(valueBoxOutput("ch_1", width = 12)),
                       fluidRow(valueBoxOutput("jp_1", width = 12)),
                       fluidRow(valueBoxOutput("ger_1", width = 12))),
                column(width = 4,
                       fluidRow(valueBoxOutput("ch_2", width = 12)),
                       fluidRow(valueBoxOutput("jp_2", width = 12)),
                       fluidRow(valueBoxOutput("ger_2", width = 12))),
                column(width = 4,
                       fluidRow(valueBoxOutput("ch_3", width = 12)),
                       fluidRow(valueBoxOutput("jp_3", width = 12)),
                       fluidRow(valueBoxOutput("ger_3", width = 12)))
  )
)

server <- function(input, output) {

  output(dollar sign)ch_1 <- renderValueBox({
    valueBox(value = "CH",
             subtitle = "Box 1")
  })

  output(dollar sign)ch_2 <- renderValueBox({
    valueBox(value = "CH",
             subtitle = "Box 2")
  })

  output(dollar sign)ch_3 <- renderValueBox({
    valueBox(value = "CH",
             subtitle = "Box 3",
             width = 12)
  })

  output(dollar sign)jp_1 <- renderValueBox({
    valueBox(value = "JP",
             subtitle = "Box 1",
             width = 12)
  })

  output(dollar sign)jp_2 <- renderValueBox({
    valueBox(value = "JP",
             subtitle = "Box 2",
             width = 12)
  })

  output(dollar sign)jp_3 <- renderValueBox({
    valueBox(value = "JP",
             subtitle = "Box 3",
             width = 12)
  })

  output(dollar sign)ger_1 <- renderValueBox({
    valueBox(value = "GER",
             subtitle = "Box 1",
             width = 12)
  })

  output(dollar sign)ger_2 <- renderValueBox({
    valueBox(value = "GER",
             subtitle = "Box 2",
             width = 12)
  })

  output(dollar sign)ger_3 <- renderValueBox({
    valueBox(value = "GER",
             subtitle = "Box 3",
             width = 12)
  })
}

shinyApp(ui = ui, server = server)
This might be a working solution to the task at hand, but it is hardly an elegant one. The valueboxes take up a large amount of space in our app and even though they can be resized or moved around, we always have to look at all the boxes, regardless of which ones are currently of interest. The code is also highly repetitive and largely consists of copy-pasted code chunks. A much more elegant solution would be to only show the boxes for each unit of interest (in our case countries) as chosen by the user. Here’s where renderUI comes in.
renderUI not only allows us to render UI objects of any type but also integrates well with the lapply function. This means that we don’t have to render every valuebox separately, but let lapply do this repetitive job for us.
The reactive way
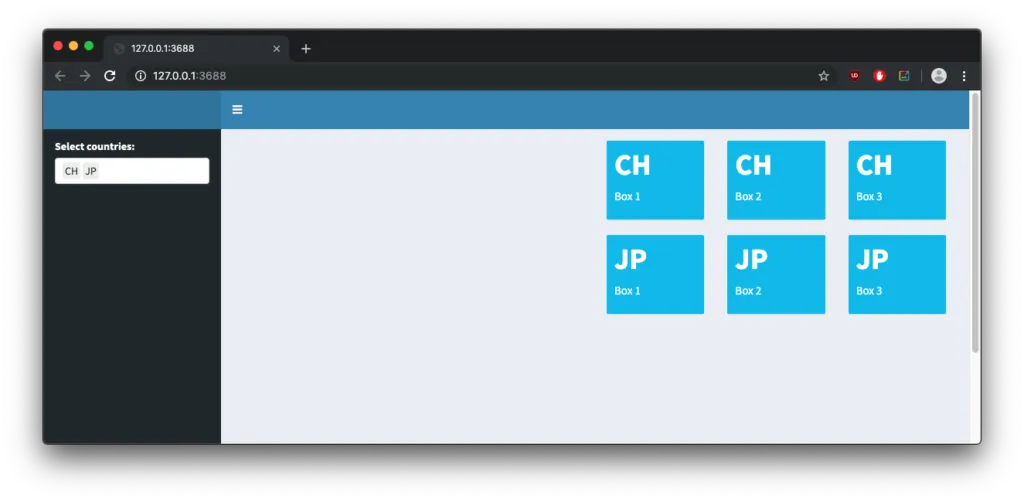
Assuming we have any kind of input named “select” in our app, the following code chunk will generate a valuebox for each element selected with that input. The generated boxes will show the name of each individual element as value and have their subtitle set to “Box 1”.
lapply(seq_along(input(dollar sign)select), function(i) {
      fluidRow(
        valueBox(value = input(dollar sign)select[i],
               subtitle = "Box 1",
               width = 12)
      )
    })
How does this work exactly? The lapply function iterates over each element of our input “select” and executes whatever code we feed it once per element. In our case, that means lapply takes the elements of our input and creates a valuebox embedded in a fluidrow for each (technically it just spits out the corresponding HTML code that would create that).
This has multiple advantages:
- Only boxes for chosen elements are shown, reducing visual clutter and showing what really matters.
- We have effectively condensed 3
renderValueBoxcalls into a singlerenderUIcall, reducing copy-pasted sections in our code.
If we apply this to our app our code will look something like this:
library(shiny)
library(shinydashboard)

ui <- dashboardPage(
  dashboardHeader(),

  dashboardSidebar(
    selectizeInput(
      inputId = "select",
      label = "Select countries:",
      choices = c("CH", "JP", "GER"),
      multiple = TRUE)
  ),

  dashboardBody(column(4, uiOutput("ui1")),
                column(4, uiOutput("ui2")),
                column(4, uiOutput("ui3")))
  )

server <- function(input, output) {

  output(dollar sign)ui1 <- renderUI({
    req(input(dollar sign)select)

    lapply(seq_along(input(dollar sign)select), function(i) {
      fluidRow(
        valueBox(value = input(dollar sign)select[i],
               subtitle = "Box 1",
               width = 12)
        )
    })
  })

  output(dollar sign)ui2 <- renderUI({
    req(input(dollar sign)select)

    lapply(seq_along(input(dollar sign)select), function(i) {
      fluidRow(
        valueBox(value = input(dollar sign)select[i],
               subtitle = "Box 2",
               width = 12)
      )
    })
  })

  output(dollar sign)ui3 <- renderUI({
    req(input(dollar sign)select)

    lapply(seq_along(input(dollar sign)select), function(i) {
      fluidRow(
        valueBox(value = input(dollar sign)select[i],
               subtitle = "Box 3",
               width = 12)
      )
    })
  })
}

shinyApp(ui = ui, server = server)
The UI now dynamically responds to our inputs in the selectizeInput. This means that users can still show all KPI boxes if needed – but they won’t have to. In my opinion, this flexibility is what shiny was designed for – letting users interact with R-code dynamically. We have also effectively cut down on copy-pasted code by 66% already! There is still some repetition in the multiple renderUI function calls, but the server-side of our app is already much more pleasing to read and make sense of than the static example of our previous app.
Beyond lapply: Going further with do.call
We have just seen that with the help of lapply renderUI can dynamically generate entire UI elements. That is, however, not the full extent of what renderUI can do. Individual parts of a UI element can also be generated dynamically if we employ the help of functions that allow us to pass the dynamically generated parts of a UI element as arguments to the function call creating the element. Within the reactive context of renderUI we can call functions at will, which means that we have more tools than just lapply on our hands. Enter do.call. The do.call function enables us to execute function calls by passing a list of arguments to said function. This may sound like function-ception but bear with me.
Following the do.call
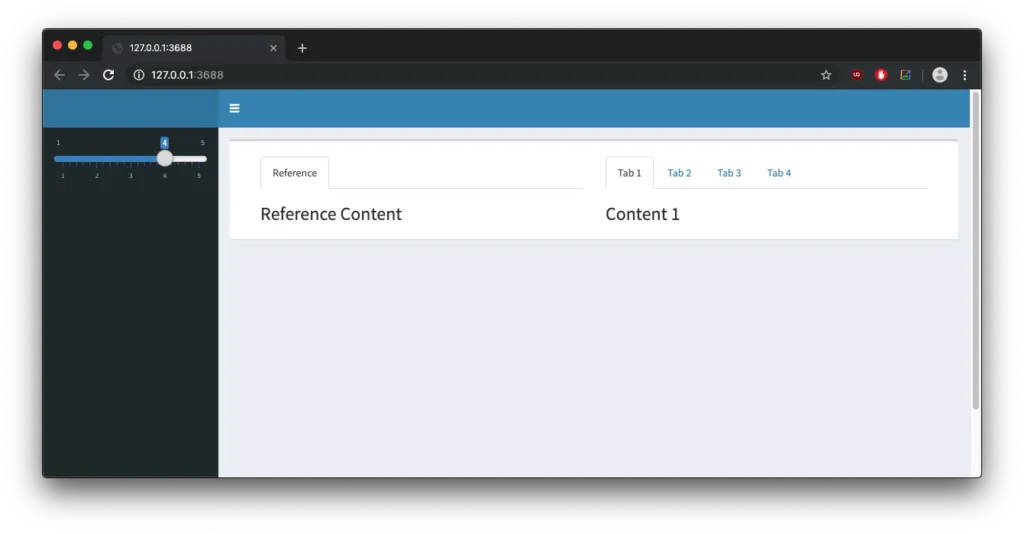
Assume that we’d like to create a tabsetPanel, but instead of specifying the number of tabs shown we let the users decide. The solution to this task is a two-step process.
- We use
lapplyto iterate over a user-chosen number to create the specified amount of tabs. - We use
do.callto execute theshiny::tabsetPanelfunction with the tabs from step 1 being passed to thedo.callas a simple argument.
This would look something like this:
# create tabs from input
myTabs <- lapply(1:input(dollar sign)slider, function(i) {

  tabPanel(title = glue("Tab {i}"),
           h3(glue("Content {i}"))
  )
})

# execute tabsetPanel with tabs added as arguments
do.call(tabsetPanel, myTabs)
This creates the HTML for a tabsetPanel with a user-chosen number of tabs that all have a unique title and can be filled with content. You can try it out with this example app:
library(shiny)
library(shinydashboard)
library(glue)

ui <- dashboardPage(
  dashboardHeader(),

  dashboardSidebar(
    sliderInput(inputId = "slider", label = NULL, min = 1, max = 5, value = 3, step = 1)
  ),

  dashboardBody(
    fluidRow(
      box(width = 12,
          p(mainPanel(width = 12,
                      column(width = 6, uiOutput("reference")),
                      column(width = 6, uiOutput("comparison"))
          )
          )
      )
    )
  )
)

server <- function(input, output) {

  output(dollar sign)reference <- renderUI({
    tabsetPanel(
      tabPanel(
        "Reference",
        h3("Reference Content"))
    )
  })

  output(dollar sign)$comparison <- renderUI({
    req(input(dollar sign)slider)

    myTabs <- lapply(1:input(dollar sign)slider, function(i) {

      tabPanel(title = glue("Tab {i}"),
               h3(glue("Content {i}"))
      )
    })
    do.call(tabsetPanel, myTabs)
  })
}

shinyApp(ui = ui, server = server)
As you can see, renderUI offers a very flexible and dynamic approach to offer to UI design when being used in conjunction with lapply and the more advanced do.call.
Try using these tools next time you build an app and bring the same reactivity to Shiny’s UI as you already used to utilize in its server part.


