At STATWORX, coding is our bread and butter. Because our projects involve many different people in several organizations across multiple generations of programmers, writing clean code is essential. The main requirements for well-structured and readable code are comments and sections. In RStudio, these sections are defined by comments that end with at least four dashes ---- (you can also use trailing equal signs ==== or hashes ####). In my opinion, the code is even more clear if the dashes cover the whole range of 80 characters (why you should not exceed the 80 characters limit). That’s how my code usually looks like:
# loading packages -------------------------------------------------------------
library(dplyr)

# load data --------------------------------------------------------------------
my_iris <- as_tibble(iris)

# prepare data -----------------------------------------------------------------
my_iris_preped <- my_iris %>%
  filter(Species == "virginica") %>%
  mutate_if(is.numeric, list(squared = sqrt))

# ...
Clean, huh? Well, yes, but neither of the three options available to achieve this are as neat as I want it to be:
- Press
-for some time. - Copy a certain amount of dashes and insert them sequentially. Both options often result in too many dashes, so I have to remove the redundant ones.
- Use the shortcut to insert a new section (CMD/STRG + SHIFT + R). However, you cannot neatly include it after you wrote your comments.
Wouldn’t it be nice to have a keyboard shortcut that included the right amount of dashes up from the cursor position? “Easy as can be,” I thought before trying to define a custom shortcut in RStudio.
Unfortunately, it turned out not to be that easy. There is a manual from RStudio that actually covers how you can create your shortcut, but it requires you to put it in a package first. Since I have not been an expert in R package development myself, I decided to go the full distance in this blog post. By following it step by step, you should be able to define your shortcuts within a few minutes.
Note: This article is not about creating a CRAN-worthy package, but covers what is necessary to define your own shortcuts. If you have already created packages before, you can skip the parts about package development and jump directly to what is new to you.
Setting up an R package
First of all, open RStudio and create an R package directory. For this, please do the following steps:
- Go to “New Project…”
- “New Directory”
- “R Package”
- Select an awesome package name of your choice. In this example, I named my package
shoRtcut - In “Create project as subdirectory of:” select a directory of your choice. A new folder with your package name will be created in this directory.
Tada, everything necessary for a powerful R Package has been set up. RStudio also automatically provides a dummy function hello(). Since we do not like to have this function in our own package, move to the “R” folder in your project and delete the hello.R file. Do the same in the “man” folder and delete hello.md.
Creating an Addin Function
Now we can start and define our function. For this, we need the wonderful packages usethis and devtools. These provide all the functionality we need for the next steps.
Defining the Addin Function
Via the use_r() function, we define a new R script file with the given name. That should correspond to the name of the function we are about to create. In my case, I call it set_new_chapter.
# use this function to automatically create a new r script for your function
usethis::use_r("set_new_chapter")
You are directly forwarded to the created file. Now the tricky part begins, defining a function that does what you want. When defining shortcuts that interact with an R script in RStudio, you will soon discover the package rstudioapi. With its functions, you can grab all information from RStudio and make it available within R. Let me guide you through it step by step.
- As per usual, I set up a regular R function and define its name as
set_new_chapter. Next, I define up until which limit I want to include the dashes. You will note that I rather setncharsto 81 than 80. This is because the number corresponds to the cursor position after including the dashes. You will notice that when you write text, the cursor automatically jumps to the position right after the newly typed character. After you have written your 80th character, the cursor will be at position 81. - Now we have to find out where the cursor is currently located. This information can be unearthed by the
getActiveDocumentContext()function. The returned object returns quite a bit of information, but we are only interested in the cursor position regarding the column. Why the column? You can think of the script like a matrix. Hitting return brings you to a new row, typing a character into a new column. Having a font with equal space characters, which is the default setting in RStudio makes this concept easy to see. - By sneaking into the nested list, we find the information we are looking for and store it in
context_col. Now we check whether the cursor is already at “column” 81. If not, there is space in which we insert the dashes. For this final step, we can use another function:insertText. - As its name implies, it inserts text in an R script or console. You can either specify a specific position in the document or, by leaving it empty, insert text at the current cursor position, which is exactly what I want right now. As the final step, I need to find out the number of dashes that should be inserted. That’s the difference between the current cursor location and its target position. For example, if the cursor blinks at column 51, meaning I already have typed 50 characters, I want to insert 30 dashes.
- To document the function, I use the “Code” > “Insert Roxygen Skeleton” feature and fill it out appropriately.
This is what my final function looks like.
#' Insert dashes from courser position to up to 80 characters
#'
#' @return dashes inside RStudio
set_new_chapter <- function(){
# set limit to which position dashes should be included
nchars <- 81
# grab current document information
context <- rstudioapi::getActiveDocumentContext()
# extract horizontal courser position in document
context_col <- context![Rendered by QuickLaTeX.com selection[[1]]](https://www.statworx.com/wp-content/ql-cache/quicklatex.com-00de0437beef075188210e33286d8e37_l3.png) range$end["column"]
# if a line has less than 81 characters, insert hyphens at the current line
# up to 80 characters
if (nchars > context_col) {
rstudioapi::insertText(strrep("-", nchars - context_col))
}
}
range$end["column"]
# if a line has less than 81 characters, insert hyphens at the current line
# up to 80 characters
if (nchars > context_col) {
rstudioapi::insertText(strrep("-", nchars - context_col))
}
}Defining the Function AS and Addin
Now we must somehow tell RStudio that this particular function should be used as an addin rather than a regular function. For this, go to “File” > “New File” > “Text File” and include the following text:
Name: Insert Dashes (---)
Description: Inserts `---` at the cursor position up to 80 characters.
Binding: set_new_chapter
Interactive: falseNameis a short description of what the addin does. This will be displayed when you want to set the shortcut later.Descriptionis a longer description of its functionality.Bindingsets the name of the function that should be called by the shortcut.Interactivedefines whether this addin is interactive (e.g., runs a Shiny application) or not.

You now must save this file as “addins.dcf” in your project with the following path: “inst” > “rstudio”. The result should look like this:

Finalize the Package
To wrap everything up and make the shortcut available to you and your colleagues, we only have to call a few more functions. Not all these steps are necessary, yet it is good practice to create a proper package.
# OPTIONAL: define the license of your package
usethis::use_mit_license(name = "Matthias Nistler")

# define dependencies you use in your package
usethis::use_package("rstudioapi")

# OPTIONAL: include your function description to the manual
roxygen2::roxygenise()

# check for errors
devtools::check()

# update/create your package
devtools::build()

> ✓  checking for file ‘/Users/matthiasnistler/Projekte/2020/blog_shoRtcut/DESCRIPTION’ ...
> ─  preparing ‘shoRtcut’:
> ✓  checking DESCRIPTION meta-information ...
> ─  checking for LF line-endings in source and make files and shell scripts
> ─  checking for empty or unneeded directories
> ─  building ‘shoRtcut_0.0.0.9000.tar.gz’
> [1] "/Users/matthiasnistler/Projekte/2020/shoRtcut_0.0.0.9000.tar.gz"
There you go! You just created an awesome package and distributed it to your friends and colleagues.
Make the shortcut available
For the last step, you have to install your package and set a keyboard combination for your shortcut. For this, use the following specification of install.packages:
install.packages(
    # same path as above
  "/Users/matthiasnistler/Projekte/2020/shoRtcut_0.0.0.9000.tar.gz",
  # indicate it is a local file
  repos = NULL)

# check if everything works
shoRtcut:::set_new_chapter()
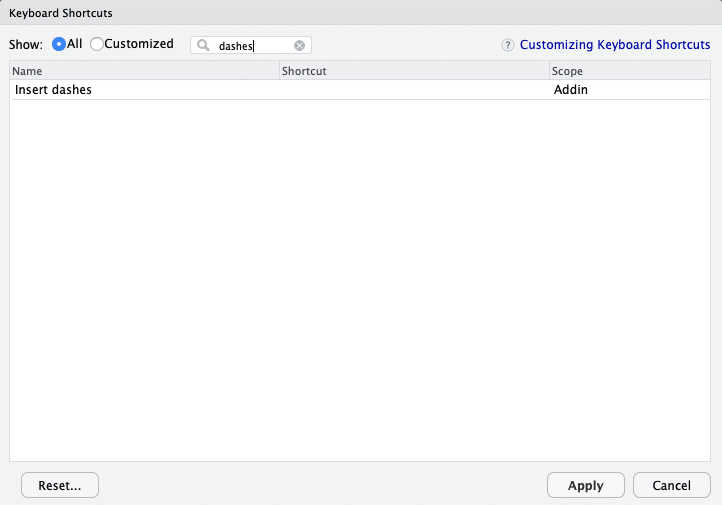
Now go to “Tools” > “Modify Keyboard Shortcuts…” and search for “dashes”. Here you can define the keyboard combination by clicking inside the empty “Shortcut” field and pressing the desired key combination on your keyboard. Click “Apply”, and that’s it!

In case you are just here to use my shortcut, you can install it via remotes::install_github("mnist91/shoRtcut").
Congratulations!
You made it! Now you can use your own RStudio shortcut. Exciting, isn’t it?
But that’s not all there is – next week, I will give you an introduction to the wonderful world of R package naming. So stay tuned and happy coding!
