
In the last three posts of this series, we explained how to train a deep-learning model to classify a car by its brand and model given an image of a car () and how to explain the model’s predictions (Part 3). This post will teach you how to build a nice-looking interface around our car classifier using Dash.
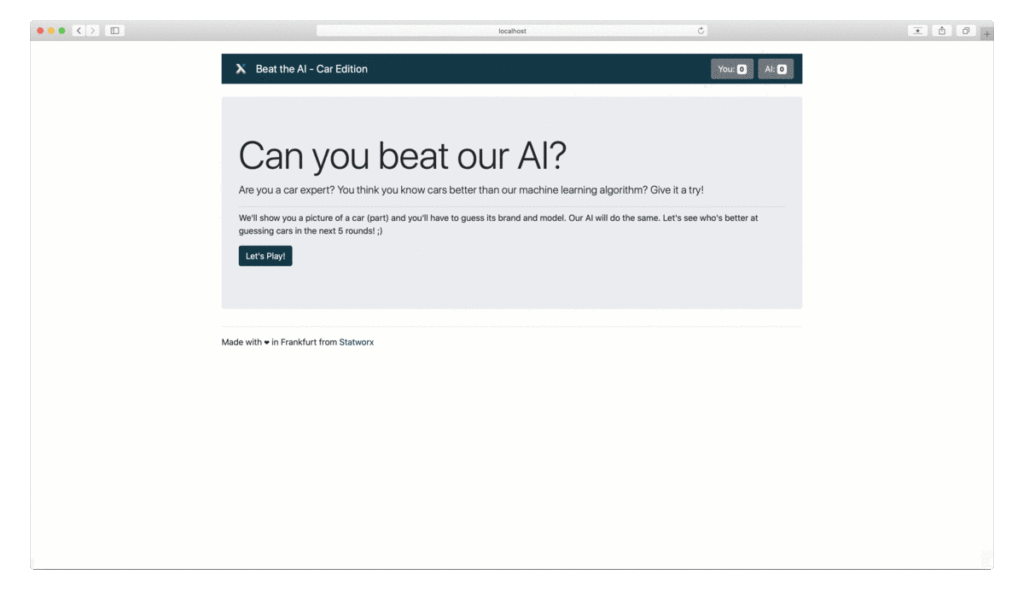
We’ll transform our machine learning predictions and explanations into a fun and exciting game. We present the user with an image of a car. The user has to guess what kind of car model and brand it is – the machine learning model will do the same. After 5 rounds, we’ll evaluate who is better at predicting the car brand: the user or the model.
The Tech Stack – What is Dash?
, as the name suggests, is software made to build dashboards in Python. In Python, you ask? Yes – you do not need to code anything directly in HTML or Javascript (although a basic understanding of HTML certainly helps). For a great introduction, please check out the excellent from my colleague .
To make the layout and styling of our web app easier, we also use . They follow broadly the same syntax as standard dash components and integrate seamlessly into the dash experience.
Keep in mind that Dash is made for dashboards – which means it’s made for interactivity, but not necessarily for apps with several pages. Anyways, we are going to push Dash to its limits.
Let’s Organise Everything – The Project Structure
To replicate everything, you might want to check out our , where all files are available. Also, you can launch all docker containers with one click and start playing.
The files for the frontend itself are logically split into several parts. Although it’s possible to write everything into one file, it’s easy to lose the overview and subsequential hard to maintain. The files follow the structure of the article:
- In one file, the whole layout is defined. Every button, headline, text is set there.
- In another file, the whole dashboard logic (so-called callbacks) is defined. Things like what’s going to happen after the user clicks a button are defined there.
- We need a module that selects 5 random images and handles the communication with the prediction and explainable API.
- Lastly, there are two files that are the main entry points to launch the app.
The Big Picture – Creating the Entry Points
Let’s start with the last part, the main entry point for our dashboard. If you know how to write a web app, like a Dash application or also a Flask app, you are familiar with the concept of an app instance. In simple terms, the app instance is everything. It contains the configuration for the app and, eventually, the whole layout. In our case, we initialize the app instance directly with the Bootstrap CSS files to make the styling more manageable. In the same step, we expose the underlying flask app. The flask app is used to serve the frontend in a productive environment.
# app.py
import dash
import dash_bootstrap_components as dbc

# ...

# Initialize Dash App with Bootstrap CSS
app = dash.Dash(
    __name__,
    external_stylesheets=[dbc.themes.BOOTSTRAP],
)

# Underlying Flask App for productive deployment
server = app.server
This setting is used for every Dash application. In contrast to a dashboard, we need a way to handle several URL paths. More precisely, if the user enters /attempt, we want to allow him to guess a car; if he enters /result, we want to show the result of his prediction.
First, we define the layout. Notable, it is initially basically empty. You find a special Dash Core Component there. This component is used to store the current URL there and works in both ways. With a callback, we can read the content, figure out which page the user wants to access, and render the layout accordingly. We can also manipulate the content of this component, which is practically speaking a redirection to another site. The empty div is used as a placeholder for the actual layout.
# launch_dashboard.py
import dash_bootstrap_components as dbc
import dash_core_components as dcc
import dash_html_components as html
from app import app

# ...

# Set Layout
app.layout = dbc.Container(
    [dcc.Location(id='url', refresh=False),
html.Div(id='main-page')])/and, therefore, the layout is start_page. We’ll talk in a bit about the layout in detail; for now, note that we always pass an instance of the app itself and the current game state to every layout.
To get this function actually working, we have to decorate it with the callback decorator. Every callback needs at least one input and at least one output. A change in the input triggers the function. The input is simply the location component defined above, with the property pathname. In simple terms, for whatever reason the path changes, this function gets triggered. The output is the new layout, rendered in the previously initially empty div.
# launch_dashboard.py
import dash_html_components as html
from dash.dependencies import Input, Output
from dash.exceptions import PreventUpdate

# ...

@app.callback(Output('main-page', 'children'), [Input('url', 'pathname')])
def display_page(pathname: str) -> html:
    """Function to define the routing. Mapping routes to layout.

    Arguments:
        pathname {str} -- pathname from url/browser

    Raises:
        PreventUpdate: Unknown/Invalid route, do nothing

    Returns:
        html -- layout
    """
    if pathname == '/attempt':
        return main_layout(app, game_data, attempt(app, game_data))

    elif pathname == '/result':
        return main_layout(app, game_data, result(app, game_data))

    elif pathname == '/finish':
        return main_layout(app, game_data, finish_page(app, game_data))

    elif pathname == '/':
        return main_layout(app, game_data, start_page(app, game_data))

    else:
        raise PreventUpdate
Everything needs to be Nice and Shiny – Layout
Let’s start with the layout of our app – how should it look? We opted for a relatively simple look. As you can see in the animation above, the app consists of three parts: the header, the main content, and the footer. The header and footer are the same on every page, just the main content changes. Some layouts from the main content usually are rather difficult to build. For example, the result page consists of four boxes. The boxes should always have the same width of exactly half of the used screen size but can vary in height depending on the image size. However, they are not allowed to overlap, and so on. Not even talking about the cross-browser incompatibilities.
I guess you can imagine that we could have easily spent several workdays figuring out the optimal layout. Luckily, we can rely once again on and the . The main idea is that you can create as many rows as you want (two, in the case of the result page) and up to 12 columns per row (also two for the result page). The 12 columns limit is based upon the fact that Bootstrap divides the page internally into 12 equally sized columns. You just have to define with a simple CSS class how big the column should be. What’s even cooler, you can set several layouts depending on the screen size. So it would not be difficult to make our app fully responsive.
Coming back to the Dash part, we build a function for every independent layout piece. The header, footer, and one for every URL the user could access. For the header, it looks like this:
# layout.py
import dash_bootstrap_components as dbc
import dash_html_components as html

# ...

def get_header(app: dash.Dash, data: GameData) -> html:
    """Layout for the header

    Arguments:
        app {dash.Dash} -- dash app instance
        data {GameData} -- game data

    Returns:
        html -- html layout
    """
    logo = app.get_asset_url("logo.png")

    score_user, score_ai = count_score(data)

    header = dbc.Container(
        dbc.Navbar(
            [
                html.A(
                    # Use row and col to control vertical alignment of logo / brand
                    dbc.Row(
                        [
                            dbc.Col(html.Img(src=logo, height="40px")),
                            dbc.Col(
                                dbc.NavbarBrand("Beat the AI - Car Edition",
                                                className="ml-2")),
                        ],
                        align="center",
                        no_gutters=True,
                    ),
                    href="/",
                ),
                # You find the score counter here; Left out for clarity
            ],
            color=COLOR_STATWORX,
            dark=True,
        ),
        className='mb-4 mt-4 navbar-custom')

    return header
Again, you see that we pass the app instance and the global game data state to the layout function. In a perfect world, we do not have to mess around with either one of these variables in the layout. Unfortunately, that’s one of the limitations of Dash. A perfect separation of layout and logic is not possible. The app instance is needed to tell the webserver to serve the STATWORX logo as a static file.
Of course, you could serve the logo from an external server, in-fact we do this for the car images, but just for one logo, it would be a bit of an overkill. For the game data, we need to calculate the current score from the user and the AI. Everything else is either regular HTML or Bootstrap components. If you are not familiar with that, I can refer once again to the from my colleague Alexander or to one of the several HTML tutorials on the internet.
Introduce Reactivity – Callbacks
As mentioned before, callbacks are the go-to way to make the layout interactive. In our case, they mainly consist of handling the dropdown as well as the button clicks. While the dropdowns were relatively straightforward to program, the buttons caused us some headaches.
Following good programming standards, every function should have precisely one responsibility. Therefore, we set up one callback for every button. After some kind of input validation and data manipulation, the ultimate goal is to redirect the user to the following site. While the input for the callback is the button-click-event and potentially some other input forms, the output is always the Location component to redirect the user. Unfortunately, Dash does not allow to have more than . Therefore, we were forced to squeeze the logic for every button into one function. Since we needed to validate the user input at the attempt page, we passed the current values from the dropdown to the callback. While that worked perfectly fine for the attempt page, the button at the result page stopped working since no dropdowns were available to pass into the function. We had to include a hidden non-functional dummy dropdown into the result page to get the button working again. While that is a solution and works perfectly fine in our case, it might be too complicated for a more extensive application.
We need Cars – Data Download
Now, we have a beautiful app with working buttons and so on, but the data are still missing. We have to include images, predictions, and explanations in the app.
The high-level idea is that every component runs on its own – for example, in its own docker container with its own webserver. Everything is just loosely coupled together via APIs. The flow is the following:
- Step 1: Request a list of all available car images. Randomly select 5 and request these images from the webserver.
- Step 2: For all of the 5 images, send a request to the prediction API and parse the result from the API.
- Step 3: Once again, for all 5 images, send these to the explainable API and save the returned image.
Now combine every output into the GameData class.
Currently, we save the game data instance as a global variable. That allows us to access it from everywhere. While this is, in theory, a smart idea, it won’t work if more than one user tries to access the app. The second user will see the game state from the first one. Since we plan to show this game on a big screen at fairs and exhibitions, it’s okay for now. In the future, we might launch the dashboard with , so every user gets his own docker container with an isolated global state.
Let’s Park the Car – Data Storage
The native Dash way is to store user-specific states into a Store component. It’s basically the same as the Location component explained above. The data are stored in the web browser, a callback is triggered, and the data is sent to the server. The first drawback is that we always have to transfer the whole game data instance from the browser to the server on every page change. This might cause quite a lot of traffic and slows down the entire app experience.
Moreover, if we want to change the game state, we have to do this from one callback. The one callback per output limitation also applies here. In our opinion, it does not matter too much if you have a classic dashboard; that’s what Dash is meant for. The responsibilities are separated. In our case, the game state is accessed and modified from several components. We definitely pushed Dash to its limits.
Another thing you should keep in mind if you decide to build your own microservice app is the performance of the API calls. Initially, we used the famous library. While we are big fans of this library, all requests are blocking. Therefore, the second request gets executed once the first one is completed. Since our requests are relatively slow (keep in mind there are fully fletched neural networks in the background), the app spends a lot of time just waiting. We implemented asynchronous calls with the help of the library. All requests are now sent out in parallel. The app spends less time waiting, and the user is earlier ready to play.
Finally Done – Conclusion and Caveats
Even though the web app works perfectly fine, there are a few things to keep in mind. We used dash well-knowing that it’s meant as a dashboarding tool. We pushed it to the limits and beyond, which lead to some suboptimal interesting design choices.
For example, you can just set one callback per output parameter. Several callbacks for the same output are currently not possible. Since the routing from one page to another is essentially a change in the output parameter (‘url’, ‘pathname’), every page change must be routed through one callback. That increases the complexity of the code exponentially.
Another problem is the difficulty of storing states across several sites. Dash offers the possibility to store user data in the frontend with the . That’s an excellent solution for small apps; with larger ones, you quickly face the same problem as above – just one callback, one function to write to the store, is simply not enough. You can either use Python’s global state, which makes it difficult if several users access the page simultaneously, or you include a .
Our blog series showed you how to the whole life cycle of a data science project, from data exploration over model training to deployment and visualization. This is the last article of this series, and we hope you learned as much as we did while building the application.
To facilitate browsing through the four articles, here are the direct links: